Overview
Inlite’s CcIQA is a Windows application, which performs check image analysis and reports the results as specified by the ANSI X9 specifications (see ANSI X9 Test Registry and Standards section), as well as additional file conformance checks.
IQA Application
Input check images to the program are provided as:
- Image cash letter files (ICL) in X9.37 or X9.100-180 format, or as
- Pairs of front and rear images in two separate one page image files, or as
- A pair of images, front then back, in a single two (2) page file.
CcIQA can be executed as a Windows Application with a User Interface (UI) or as a Command Line processor, in which case it can be executed from another application, as a part of batch processing or from a high level Workflow System.
ANSI X9 specifications describe a large number of tests, parameters and results. Use of XML for both configuration and results allows for maximum flexibility in targeting CcIQA to specific customer needs. Numerous XML tools (DOM, XPath, etc) are available for easy configuration definition and processing IQA results (see File Structures section)
Command Line is a preferred mode for production environment, while the User Interface is a useful tool for evaluation and testing. Development of production configurations is supported by Command Line parameters that match the User Interface controls. (See User Interface and Command Line sections)
User Interface
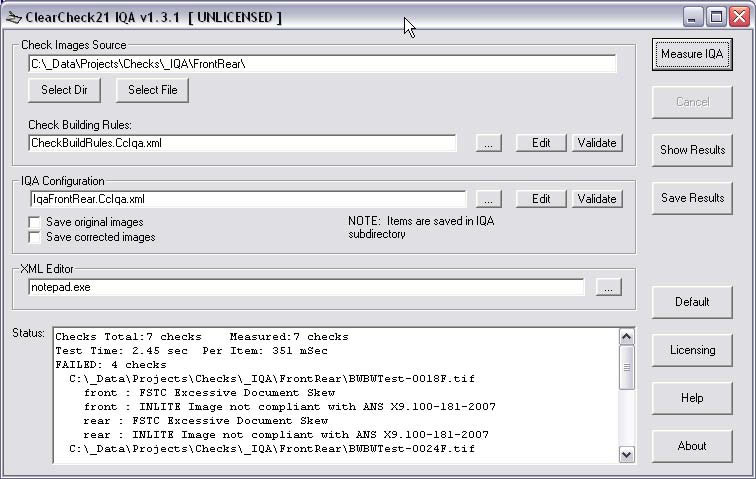
The following are the main elements of user interface:
- Check Images Source text box – Specify a single file or a directory containing check images (front and rear). Use Select Dir or Select File buttons to browse the source. If the text box points to non-ICL file, the program will try to find matching front or rear image. If more then one file or directory is entered, each should be in quotes, separated by spaces, e.g: "file1" "dir2"
-
Check Building Rules – specifies location of XML file information how to match front and
rear image pairs (See Check Building Rules File). The default configuration file
CheckBuildRules.CcIqa.xml is installed in application directory.
Use […] button to browse to the rules file. Use the Validate button to check the syntax of the rules file. -
IQA Configuration
- Specify location of XML file with CcIQA configuration parameters (see CcIQA Configuration File).
Default configuration file IqaFrontRear.CcIqa.xml is installed in application directory.
Use […] button to browse to configuration file.
Use Edit button to edit contents of specified file using specified XML Editor.
Use Validate button to check syntax of configuration file. -
Save Original Images – enable saving of check images in a multipage TIFF file.
File is located in IQA subdirectory of original file directory.
Name of image file is input_filename_base .images.tif, where input_filename_base is base name portion of input file name.
NOTE: Saving images slows down processing. -
Save Corrected Images – enable saving of corrected images of checks in a
multipage TIFF file. Correction might include deskew, frame removal, etc.
File is located in IQA subdirectory of original file directory.
Name of image file is input_filename_base.docs.tif, where input_filename_base is base name portion of input file name.
- Specify location of XML file with CcIQA configuration parameters (see CcIQA Configuration File).
-
XML Editor – specifies file to edit configuration and Check Building rules files.
Use […] button to browse to XML editor. - Measure Button – start IQA measurement process
- Cancel Button – allows user to cancel measurement in progress. Enabled only during measurements.
- Show Results Button – displays last measurement results using application specified in Windows for viewing XML files. Often it is an Internet Explorer.
- Saves Results Button – saves last measurement results in selected file.
- Default Button – resets UI controls to default value.
- Licensing Button – starts Inlite Licensing Manager to register and maintain licenses
- Help Button – displays this file.
- About Button – displays information about application.
- Status – displays measurement status.
Command Line Interface
To invoke CcIQA from command line, in batch file or from workflow application use the following format:
CcIqaProcessor "source" ["source" …] options
Options start with dash followed option key (one or more letter), followed by value. If value is file or directory name, put it in quotes. Valid options are:
source – File(s) or directory(s) containing check images or Image Cash Letter
filename. File corresponds to Check Images Source value in UI. For batch processing at
least one valid source is required. Each source should be in quotes, separated by spaces.
-c"filename" – Configuration file location. This corresponds to IQA Configuration in UI. If
not specified, default file is used.
-r"filename" – Check Building rules file location. This corresponds to Check Building
Rules in UI. If not specified, default file is used.
-o"filename" – Results file location.
-e"filename" – Error log file location.
-img – Enable saving of check images. This corresponds to Save Original Images checkbox
-doc – Enable saving of check’s document images. This corresponds to Save Document Images checkbox
-ui – start in Windows Application mode. This is the same if source is not specified
-ud – the same as –ui, but use default control values
-uz – start command line processing. Display UI with status. Exit UI after processing.
-ux – the same as –uz, but exit after processing.
To execute processing from command line without UI: specify source(s) and use no –u? options.
IQA Configuration File (CF)
CF is an XML file specifying IQA measurement parameters. IqaFrontRear.CcIqa.xml is a sample file. Please study it carefully. The following outlines the structure of this file:
<CcIqaConfig>
    <TestSet side="front|rear" name="ts_name" disable="0|1">
    <TestName name="t_name" " disable="0|1">
    <ParameterName>value</ParameterName>
    ... – more ParamterName elements
    ... – more TestName elements
Note: Variable values are shown in italic. Attribute values separated by "|" represent the permitted values.
Where:
- CcIqaConfig – Root element
-
TestSet – Test set specification. One or more may be defined. Multiple test
sets apply different measurement parameters to the front and rear of
a check. They also allow the user to create financial institution
specific pass/fail criteria. Their attributes are:
- side – Optional. Valid values: front or rear. If omitted, the test set applies to both sides. If present, the test set applies only to the specified side.
- name – Optional. Name identifying test set in results.
- disable – Optional. Valid values 0 or 1. Default is 0. Allow to disable specific test set.
-
TestName
– Test specification. Name of this element is test identifier. Valid test
identifier is one of the names present in the example file. Names are
derived from X9 Registry. Their attributes are:
- name – Optional. Name identifying test in results.
- disable – Optional. Valid values 0 or 1. Default is 0. Allow to disable specific test set.
- ParameterName – Parameter specification. Valid name parameter identifier element is one of the names present in the example file. The names are derived from X9 Registry. All parameters required for test should be specified. Value ranges are specified in X9 registry. The example file has recommended values, but the industry did not establish a unified set of values, and the user is free to change them.
IQA Result File (RF)
RF is an XML file containing results of the IQA measurement and test specification from parameters. The following outlines the
structure of the IQA Result File:
<CiImageList time="time_stamp">
  <file path="filename" image="image_count" icl="1" iclItems="icl_items_count">
    <check path="filename?item|image=item_nmb" front="image_number" rear="image_number" type="iclItem|imageItem">
      <image path="filename?image=image_nmb" side="front|rear">
        <Results type="CcIQA" time="time_stamp" id="test_definition_id">
          <IqaTestSet side="front|rear" name="ts_name">
            <IqaTest test="tessName" name="t_name" dscr="description" status="Pass|Fail|Indeterminate">
              <parameters>
                 <ParameterName dscr="description" isSet="true|false" unit="unit_name">value</ParameterName>
                 ... – more ParamterName elements
              <results>
                <ResultName dscr="description" status="Pass|Fail|Indeterminate" unit="unit_name">value</ResultName>
                ... – more ResultName elements

            ... – more IqaTest elements
          ... – more IqaTestSet elements
       ... – image element for rear side
    ... – more check elements
Note: Variable values are shown in italic. Attribute values separated by "|" represent valid expected values.
Numerous tools can be used to extract need data from the RF. For example, to obtain list of check elements that have at least
one failed test use the following DOM API call with XPath specification:
FailedChecksList = doc.selectNodes("//check[count(descendant::IqaTest[@status='Fail']) > 0]")
Additionally optional elements FileInfo, TiffImageInfo, IclInfo, IclItemInfo, IclImageInfo are present in RF if
corresponding flags are set in InfoFlags of Check BuildingFile (CBF). If needed review contents of Result File to understand structure
of these optional elements
Check Building Rules File (CBF)
CBF is a XML file specifies how to search and to create pairs of front/rear images constituting a check. Additionally it specifies flags to put additional information about files, images and ICL into RF. DirWalkRules.CcIqa.xml is an example file. Please examine it carefully. The following outline the structure of this file:
<CiItemsListConfig>
  <SubDirLevels>value</SubDirLevels>
  <IncludeFiles>mask_list</IncludeFiles>
  <ExcludeFiles>mask_list</ExcludeFiles>
  <FrontRearMatch>match_list</FrontRearMatch>
  <InfoFlags TiffInfo="0|1" FileInfo=="0|1" IclInfo=="0|1" IclItemInfo=="0|1" IclImageInfo="0|1"/>
Note: Variable values are shown in italic. Attribute values separated by "|" represent only
valid values.
Where:
CiItemsListConfig – Root element
SubDirLevels – Identifies number of subdirectory levels to be processed:
1 – process only specified directory
0 – process all subdirectories
n – process specified directory and up to n-1 subdirectory levels
IncludeFiles – Specifies semi-column-separated list of masks of files to be included in measurements,e.g *.tif;*.pdf includes TIF and PDF files. CBF should have a least on mask defined. CBF can contain one or more IncludeFiles elements
ExcludeFiles – Specifies semi-column-separated list of masks of files to be excluded from measurements, e.g. _*.* excludes all files starting with underscore (_) CBF can contain zero or more ExcludeFiles elements
FrontRearMatch – Specifies semi-column-separated list of match patterns. System searches for filenames that defers only by specified match pattern. Match pattern is 2 string, separated by column: front_string:rear_string.
- E,g. if match pattern is f.:b.
Files 123f.tif and 123b.tif are matched.
Files 123f.tif and 124b.tif are not matched ( 3 <> 4)
Files 123f.tif and 123r.tif are not matched (r. <> b.) - Special matching pattern are
1/2 page 1 in the file is a front image, page 2 is a rear image
odd/even each odd page is a front image, next even page is a rear image
CBF can have any number of match patterns in a single or multiple FrontRearMatch elements.
InfoFlags – Optional. Controls additional information to be placed in RF. If not
present, no additional information is emitted. Attributes:
TiffInfo – Optional. If 1 – emits information about image format and
geometry.
FileInfo – Optional. If 1- emits information about file format and number of
images
IclInfo – Optional. If 1- emits information applicable to whole ICL file
IclItemInfo – Optional. If 1- emits information applicable to an Item in ICL file
IclImageInfo – Optional. If 1- emits information applicable to an Image in ICL
file
ANSI X9 Test Registry and Standards
ASC X9 Standards Committee on Banking is an Accredited Standards Committee (ASC) of American National Standards Institute (ANSI) is responsible for standardization in the area of Financial Services.
Working with Financial Services Technology Consortium (FSTC), X9 developed more formal set of test definitions outlined in the following sources:
• Test specifications are defined in "Check Image Test Registry" documents in X9 Registry (http://www.x9.org/standards/registry)
• Reporting of test results is described in X9.100-180-2006 standard "Specifications for Electronic Exchange of Check and Image Data". Specifically test reporting is described in Section "Image Test Detail Record (Type 56)"
Note that the Type 54 record, preserved for compatibility with old X9.37-2003 standard is not recommended for use in new applications. However, if needed, tests implemented in ClearCheck21 IQA can be used to set fields in the Type 54 record as well.
Inlite’s ClearCheck21 IQA is a software component that is packaged as a set of Windows COM objects for easy integration in various applications.
Scope MetricsIt performs the measurements and reports the metrics and flags as required by the FSTC IQA tests listed in the X9 registry. ClearCheck21 IQA implements the subset of FSTC tests that applies to bitonal images and is the most significant for the usability of check images. The scope of the testing exceeds the IQA metric requirements mandated by the Federal Reserve in Sep 2007 for exchange images.
The specific metrics implemented by ClearCheck21 IQA are shown below:
|
Metric/ Defect |
X9 Registry Test Document |
Measure |
|
Undersize Image |
Test_002 |
Image size in inches |
|
Folded or Torn Document Corners |
Test_003 |
Missing area in tenths of inches |
|
Document Framing Error |
Test_006 |
Extra scan area in tenths of inches |
|
Excessive Document Skew |
Test_013 |
Skew angle in degrees |
|
Oversize Image |
Test_001 |
Image size in inches |
|
Image Too Light |
Test_008 |
Pixel percentage |
|
Image Too Dark |
Test_007 |
Pixel percentage |
|
Horizontal Streaks in Image |
Test_015 |
Pixel percentage in scan line |
|
Below Minimum Compressed Image Size |
Test_011 |
Compressed image size in bytes |
|
Above Maximum Compressed Image Size |
Test_010 |
Compressed image size in bytes |
|
Excessive “Spot Noise” in Image |
Test_014 |
Count of noise spots |
|
Front-Rear Image Dimension/Feature Mismatch |
Test_009 |
Image size difference |
ClearCheck21 IQA API
Overview and Installation
Use ClearCheck21 IQA API to access ClearCheck21 IQA functionality within your applications. To use:
- Download and install ClearCheck21 IQA
- Download and install ClearImage SDK
- Develop your application using C# or VB6 examples supplied with ClearCheck21 IQA. Follow instructions below.
-
For C# project
- Use x86 configuration
- Add COM references to ClearCheck21 IQA.
- References to ClearImage and VBA will be added automatically.
- Make sure to:
- Use
mutexto prevent reentrancy - Call
oIqa.DoClose()method to free memory and images
- Use
For production use:
- Purchase ClearCheck21 IQA licences. Inlite will send you registration certificate.
- Download and install ClearImage PDK. Link is provided after purchase
-
Register Certificate
- Run Inlite Control Center. Start menu -> ClearImage -> Inlite Control Center – Licensing
- Select ClearCheck Application in Product Group
- Click Register button and follow instructions
The following demonstrates typical uses of API. Visual Basic 6 notation is use for simplicity,
Nomenclature
The nomenclature is represented as test/parameters/results. Sections are separated by ":"
- Definition source: If derived from the X9 registry, all names start with X9.
-
The Test name is either:
- Test X9 number and version separated by "-": e.g. 003.00-00
OR - Test X9 XML name from registry: e.g. FoldedTornDocCorners
- Test X9 number and version separated by "-": e.g. 003.00-00
-
Parameter name is either:
- Parameter X9 Reference Number: e.g. P1
OR - Parameter X9 XML name from registry: e.g. MaxCornerFoldBRHThreshold
- Parameter X9 Reference Number: e.g. P1
-
Result name is either:
- Result X9 Reference Number: e.g. R1
OR - Result X9 XML name from registry: e.g. CornerFoldBRW
- Result X9 Reference Number: e.g. R1
Configuration
Configure the ClearCheck21 IQA process as follows. Note that the nomenclature offers several alternatives for convenience and clarity:
-
Create the IQA object:
set oIQA = new ClearCheckIQA.IQA
-
To save processing time, you may disable tests that should NOT be performed: Using the test Number and Version
oIQA.Front.Test("X9:011.00-00").Enabled = falseOR using the XML name
oIQA.Rear.Test("X9:ImageOutOfFocus").Enabled = false -
Specify the parameter values of the test, for the front and for the rear image tests: Using the Test object:
oIQA.Front.Test("X9:UndersizeImageDimension").Parameter("P1").Value = 1234OR using the Test Number/Version/Parameter Reference:
oIQA.Front.Parameter("X9:003.00-00:P1").Value = 1234OR using the XML name:oIQA.Rear.Parameter("X9:UndersizeImageDimension:MinImageHeightThreshold").Value = 1234NOTE: If any parameter for a test is not set, test is not executed. To test if parameter is set:
bIsSet = oIQA.Front.Parameter("X9:003.00-00:P1").isSetTo assign default value to a parameter:
oIQA.Front.Parameter("X9:003.00-00:P1").SetDefault
Check image processing
Execute test and obtained results for each check:
-
Assign images to front and back. For example check images is in 2-page TIFF file:
oIQA.Open("check.tif")To open front and rear images from arbitrary files
oIQA.Front.Image.Open("imageFront.tif", 1) oIQA.Rear.Image.Open("imageRear.tif", 1) -
Execute test as configured:
oIQA.DoTests
-
Retrieve and process image results. Use one of these methods:
-
Obtain IQA Result File (RF) as a string
Dim results as String
results = Iqa.ResultsToXml(ECcIqaXmlFormat.eixfRaw)
-
Process each test result:
Front imageDim oTest as CcTest ' Retrieve results for front image for each oTest in oIQA.Front.Tests ' Created application specific oType56 object if (oTest.isValid) then _ CreateType56 (oTest.ImageTestFlag, _ oTest.ImageTestNumber, oTest.ImageTestVersion, _ Test.TestResultsLength, oTest.TestResults, _ TestParametersLength, oTest.TestParameters, _ Test.UserTestDataLength, oTest.UserTestData) nextNote:CreateType56method is customer application method that processes test results.
For example it can prepare a Type 56 record to be added to a cash letter file.
Rear image. Use the same syntax as shown above, replacingFrontwithRear.
- Implement your own pass/fail logic, results of each test can be obtained directly.
To check if test result value was measured:
isValid = oIQA.Front.Test("X9:UndersizeImageDimension:ImageHeight").isValidTo obtain value using test XML Name and Result Reference :
data = oIQA.Front.Test("X9:UndersizeImageDimension").Result("R1").ValueOR using Test Number/Version/Result Reference:
data = oIQA.Front.Result("X9:003.00-00:R1").ValueOR using Test Number/Version/XML Name:
data = oIQA.Front.Result("X9:003.00-00:ImageHeight").ValueOR using XML name:
data = oIQA.Rear.Result("X9:UndersizeImageDimension:ImageHeight").Value
-
Obtain IQA Result File (RF) as a string
-
Free test memory and images:
oIQA.DoClose
Error Reporting
If errors are detected during test execution DoTests method return false, otherwise it returns true.
Error information is reported in ErrorText properties.
If no error is detect value of ErrorText property is an empty string.
If (oIQA.DoTests = false) then
  errorFront = oIQA.Front.ErrorText
  errorRear = oIQA.Rear.ErrorText
End if